At first glance, a School Library today looks much as it did a century ago: rows and rows of books. But, a second look reveals the influx of technology with desktop, laptop, and tablet computers. By the turn of the millennium, computers and their associated digital applications significantly changed School Libraries. Nowhere is this more visible than with online subscription database services available through the Internet.
Online subscription resources in K-12 schools began as add-ons to familiar print resources—digitized copies of encyclopedias, periodicals, biographies. They were costly, so most schools had only one, or maybe two. As online subscription services proliferated, they became affordable, and now are the primary reference resource in most secondary schools. Eventually service providers combined different types of reference into their own brand-name tools, so now a single resource can provide multiple forms of reference beyond what the tool’s common name would suggest.
SCHOOL LIBRARIANS ARE THE INFORMATION SPECIALISTS
In my medium-sized district, our middle schools alone have access to more than 40 different online subscription services—4 encyclopedias, 9 periodical databases, and more than 30 specialty reference databases and e-books. Imagine being a student or teacher seeing that long list of resource names on a school webpage. They are too bewildered to determine which service to use for their information need, so it’s no wonder they become discouraged and simply type some search terms into Google.
 Information Specialists") It’s unrealistic to expect intermittent users to know our online subscription services and their features, or take the time to learn—on their own—how to use these database services. These services are usually chosen and funded by the District Library Department or the individual School Librarian, so it’s our responsibility as School Librarians to know what each of these online subscription services offer, and to determine when and with whom to use each feature of each resource. After all, we are the Information Specialists; we are the Instructional Partners, familiar with everyone’s curriculum; we are the Future Ready Librarians who curate, manage, and integrate digital resources for our students and teachers.
It’s unrealistic to expect intermittent users to know our online subscription services and their features, or take the time to learn—on their own—how to use these database services. These services are usually chosen and funded by the District Library Department or the individual School Librarian, so it’s our responsibility as School Librarians to know what each of these online subscription services offer, and to determine when and with whom to use each feature of each resource. After all, we are the Information Specialists; we are the Instructional Partners, familiar with everyone’s curriculum; we are the Future Ready Librarians who curate, manage, and integrate digital resources for our students and teachers.
We can’t just run through the list, telling teachers and students all that’s available: if it isn’t immediately relevant to classroom learning, it’s meaningless and quickly forgotten. Instead, we need to create Library Lessons that integrate particular features of specific tools with a classroom activity.
INTEGRATING ONLINE SUBSCRIPTION RESOURCES
I treat online resources the same as the print collection. I don’t introduce all the Dewey Subject books at once, but rather, each topical group as it applies to a classroom assignment. So also, I introduce online resources during subject area visits, focusing on features that fulfill the purpose of the library visit, avoiding others that do not.
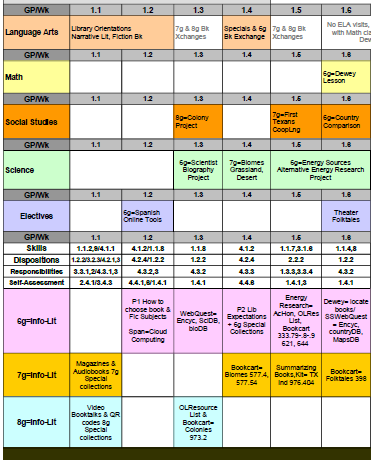
Sample Library Lesson Matrix
I use my Library Lesson Matrix to organize online resource lessons. Just as I examine each subject’s curriculum to identify a possible library lesson to enter into my Matrix, so also I examine each online subscription service. I utilize any trainings offered online and try out each feature to see which curriculum need it can satisfy and for which grade level. I record brand name and features into the subject units, then move on to the next online service.
It takes time to go through all the services, but I become comfortable enough with each tool to integrate it and teach it. By mapping these out in my Matrix, I can progressively build online skills so students are proficient in using our online subscription resources before they leave our campus.
USING INFORMATIONAL MATERIALS CORRECTLY
 There’s continuing controversy about requiring students to use print or digital or online sources for assignments. We must help teachers realize that the format of information (print vs digital vs online) is NOT important, but rather the TYPE of resource and its content value:
- Encyclopedias for general information and overview of topic;
- Content-specific resources for in-depth information;
- Periodicals for focused, condensed, and current information.
Encyclopedias and periodicals, in print, digital, or online versions, are pretty obvious, but content resources aren’t as obvious to students and teachers, so I always include specifics about these:
- Print content includes all those specialty tomes we have in our reference area or topical books in the Dewey area.
- Digital includes CDs and DVDs that we got primarily for teachers but students can be using them, too.
- Online includes e-books, subscription services (like a biography database), and Web-based books (like Google Books, Project Gutenberg, Digital Book Index).
When I collaborate with teachers, I articulate the different types of resources and recommend what’s best for students to use for the assignment. In my Library Lesson I teach students about types of resources and how to use whichever format is accessible when working on the assignment—print version, in-house digital version, or online version. This is important in a digitally-divided school where some students may not have online access from home.
With Library Lessons that focus on type rather than format, students and teachers learn that print, digital, and online information sources all contribute to student success.
HOW I TEACH ONLINE SUBSCRIPTION SERVICES
 Carefully crafted Library Lessons, customized for each grade level, scaffolded throughout the school year, and aligned with classroom curriculum activities help students (and teachers) become familiar with which online subscription resource feature to use for their information need. It takes time and curriculum savvy to create these lessons, but we can use them year after year for the same online services.
I’ve discovered the best way to scaffold these type of lessons is to use WebQuests to introduce online services a few at a time, use curated folders of bookmarked articles within each online service for specific assignments, and to create Resource Lists of online services and other Web-based tools for longer research assignments.
WebQuests to Introduce Services
WebQuests are my favorite way to introduce online subscription database services. Using the term “WebQuest” to introduce our online resources emphasizes to students that they are the first, best choice to find information on the WorldWideWeb. Each of my WebQuests is designed for a single class period, presents just 3 different online tools with 1 or 2 features of each, and satisfies a particular classroom assignment. Teachers appreciate this guided introduction to high-quality resources that is integrated into their lessons, and, because students respond on a printed or digital worksheet, there’s a daily grade for the class period.
I believe an encyclopedia is the best reference tool for students to begin research, so the first WebQuest of the school year introduces a grade-appropriate online encyclopedia, and I use it for that grade’s online lessons throughout the school year. Repeatedly using a familiar tool activates prior knowledge so students become comfortable using various features of the tool, and we develop online browsing and searching skills that they can apply to other online resources.
As an example, my first two 6g WebQuests—one for Science, one for Social Studies—occur about 2 weeks apart. The only difference is in the features I introduce to meet the needs of the two different subjects.
| 6g Science Biography WebQuest | 6g Social Studies Countries WebQuest |
|
|
Subsequent 6g WebQuests begin with the same encyclopedia and offer 2 additional subscription resources that meet the needs of the subject, the project, the research, and the lesson. Eventually 6g students learn all the subscription services relevant to their grade-level, how to locate them on the main library page, and how to use their features. (If they ask about other tools they find on the resource homepage, I say I’ll teach them in higher grades, but they’re free to examine them on their own.)
Curating & Bookmarking for Specific Library Lessons
User-created folders is a feature now offered by most online subscription services, where we can curate folders for subjects and grade levels, and then bookmark into them articles chosen from their database. I love using curated folders & bookmarked articles to guide students who have a limited time frame for certain assignments. Once I create a named folder within a service, we can use that same folder and its articles for the same lessons in following years, for as long as we have the online service.
An example of such curating is our English/Language Arts expository text unit across all 3 middle school grade levels. Bookmarked online articles are a perfect match for the unit’s elements:
- Unit theme=Technology & the Power of Information.
- Content skills=summarization, inference, and interpretation.
- Required resources=non-fiction books, newspapers, magazines, memoirs, speeches.
- Final product=an expository written instrument.
At successive library visits during the grading period, I progressively build Info-Lit skills using different resource formats to activate prior knowledge and then lead students into new experiences to create a final product unique to each grade:
| 6g ELA | Visit 1) Examine components of non-fiction print books (table of contents, index, glossary, graphics). Visit 2) Learn how to summarize a print magazine article. Visit 3) Access the chosen online service, go to named folder, read a bookmarked article, and create an expository essay poster with your table group. |
| 7g ELA | Visit 1) Compare non-fiction print books and e-books. Visit 2) Locate new online service, access named folder, and summarize bookmarked magazine article. Visit 3) Using the same online service, do a topical search, read at least 2 articles, and create a written essay. |
| 8g ELA | Visit 1) Examine print memoirs from the Biography area. Visit 2) Access and compare a topical non-fiction print book, an e-book, and a free Web-based memoir. Visit 3) Access online services and read bookmarked and self-searched articles to produce an online e-zine. |
Resource Lists for Longer Research Assignments
Once students have learned how to access and use grade-appropriate online subscription services, I guide them less formally to relevant online resources through customized Resource Lists. Others may call this a Subject Guide, Library Guide, or Pathfinder. (Academic librarian Patricia Knapp devised and named the “Pathfinder” in the 1960s as course resources for college students.) I call it a “Resource List” because it’s a list of resources which support a research assignment.
I build a Resource List using my Library Lesson Planner, just as I would any library lesson. Why so much work?
- I want to be sure the Resource List fulfills subject & information literacy standards and meets research requirements of the final product.
- Teachers typically intend a library visit as an introduction to a research project, so I want a short, meaningful lesson to cultivate the requisite Information Literacy skills along with presenting the Resource List.
LibLessonPlanner example
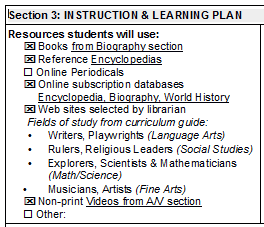
As I fill out my Library Lesson Planner for “Resources students will use,” I refer to my Library Lesson Matrix to glean print and online resources I’ve already selected as grade and subject appropriate for the assignment. I also enter any guidelines from teachers or subject curriculum guides to help me choose other Web sites that will be helpful for students.
I organize my Resource List according to the problem-solving model I’ve chosen as best for the particular research assignment, and I create it as a webpage so students can access it 24/7 (and so I can make changes or additions without issuing a new handout). Here is a brief enumeration of what I might include on my Resource Lists, as applicable to the project and the problem-solving model:
1. Problem-solving model as organizational structure
2. Recommended resources for background reading/investigation
3. Guidelines for creating questions about the research topic
4. Search strategies for different resources
5. Reminders about citation and creating a bibliography
6. Reminders about paraphrasing and summarizing
7. Resources available in the library (books, reference, other)
8. Recommended online subscription services
9. Recommended Web sites chosen by the librarian or teachers
10. Reminders about assignment requirements (from the teacher’s checklist)
USING OTHER ONLINE SERVICES FOR SUBSCRIPTION SERVICES
When I began creating my Library Lessons for online subscription services in the early 2000s, we used printed guides, but over the years I’ve transmuted them into digital and online documents. For example, WebQuests have become HyperDocs, bookmarking & curation lessons also use tools such as TES blendspace, elink.io, or Wakelet, and my Resource Lists are Symbaloo webmixes or Webjets.
Regardless of the subscription services we have or the other online tools we might use to facilitate lessons, the essence of teaching online subscription services to our students is this:
- Limit lessons to grade-appropriate services
- Refine choices to only 2 or 3 different services
- Focus on content-relevant features
![]()